
Resize, crop and other common transformations
A comprehensive guide that covers all the commonly used image transformations that you will need for your web applications.
Basic image resizing
Width - (w)
Used to specify the width of the output image. Accepts integer value greater than 1. If a value between 0 and 1 is specified, it acts as a percentage width. Therefore, 0.1 means 10% of the original width, 0.4 means 40% of the original width, and so on.
You can also specify the auto_ _value for this parameter (w-auto). Doing so will instruct ImageKit to read the width value from the Sec-CH-Width Client Hint request header. Learn more about client hints here.
You can also provide an arithmetic expression such as iw_div_2, cw_mul_0.8, or ih as a value for this parameter. Doing so will first calculate the value of the expression and then apply transformations using that value. Learn more about arithmetic expressions here.
Height - (h)
Used to specify the height of the output image. Accepts integer value greater than 1. If a value between 0 and 1 is specified, the value acts as a percentage height. Therefore, 0.1 means 10% of the original height, 0.4 means 40% of the original height, and so on.
You can also provide an arithmetic expression such as ih_div_2, ch_mul_0.5, or ih as a value for this parameter. Doing so will first calculate the value of the expression and then apply transformations using that value. Learn more about arithmetic expressions here.
Aspect ratio - (ar)
Used to specify the aspect ratio of the output image or the ratio of width to height of the output image. This parameter must be used along with either the height(h) or width(w) parameter. The format for specifying this transformation is ar-<width>-<height>
You can also provide an arithmetic expression such as iar_div_2, or car_mul_0.75 as a value for this parameter. Doing so will first calculate the value of the expression and then apply transformations using that value. Learn more about arithmetic expressions here.
If you specify both height(h) and width(w) in the URL along with aspect ratio(ar), then the aspect ratio is ignored.
Crop, Crop Modes and Focus
If only, one of the height(h) or width(w) dimensions is specified, then ImageKit.io adjusts the other dimension accordingly to preserve aspect ratio and no cropping takes place.
But when you specify both height(h) and width(w) dimensions, you need to choose the right cropping strategy based on your website layout and desired output image.
Tip for choosing the right cropping strategy
When choosing among different strategies for cropping, think in terms of your website layout and desired output image.
If you want to preserve the whole image content (no cropping) and need the exact same dimensions (height and width) in the output image as requested, choose either of the pad resize crop or forced crop strategy.
If you want to preserve the whole image content (no cropping), but it is okay if one or both the dimensions (height or width) in the output image are adjusted to preserve the aspect ratio. Then choose either of the max-size cropping or min-size cropping strategy. You can also use max-size-enlarge cropping strategy if you want to allow enlarging of image in case requested dimensions are more than original image dimension.
If you need the exact same dimensions (height and width) in the output image as requested but it's okay to crop the image to preserve the aspect ratio (or extract a region from the original image). Then choose either of the maintain ratio crop or extract crop or pad extract crop strategy. You can combine the extract crop strategy with different focus values to get the desired result.
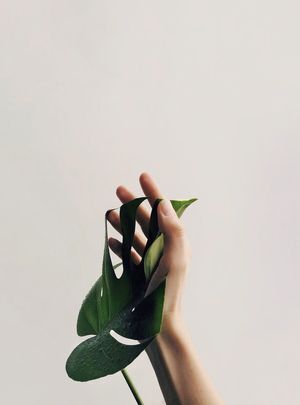
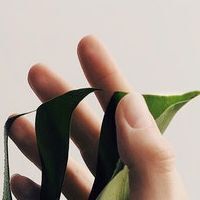
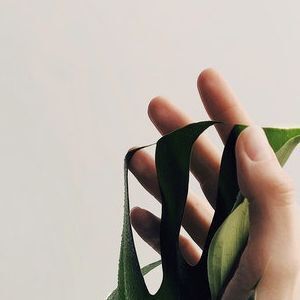
Pad resize crop strategy - (cm-pad_resize)
In the pad resize crop strategy, the output image's dimension (height and width) is the same as requested, no cropping takes place, and the aspect ratio is preserved. This is accomplished by adding padding around the output image to get it to match the exact dimension as requested.
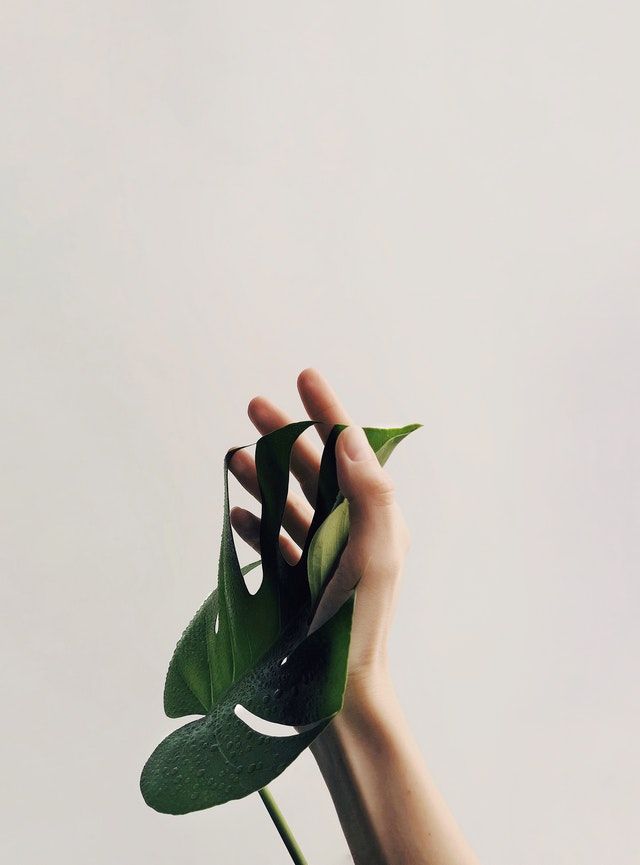
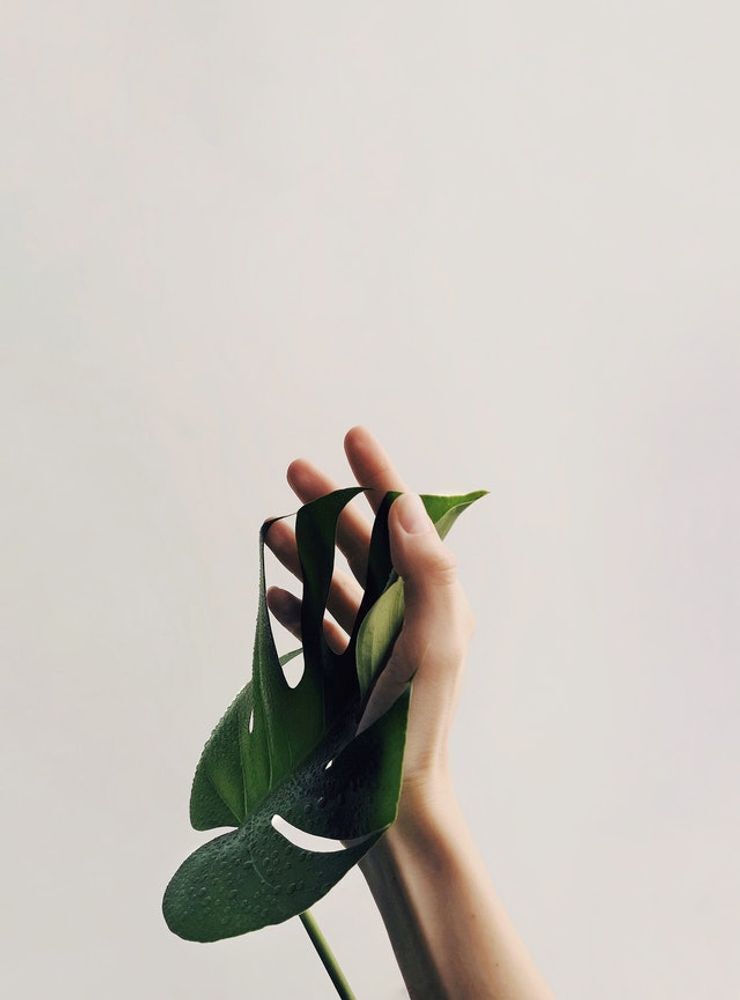
Example - All padding on one side
In the examples above, we saw that when the image is padded using the pad resize crop strategy, the padding is equal on both sides of the image. However, there might be cases where we want all the padding to be added on only one side of the image. This can be done using the focus (fo) parameter.
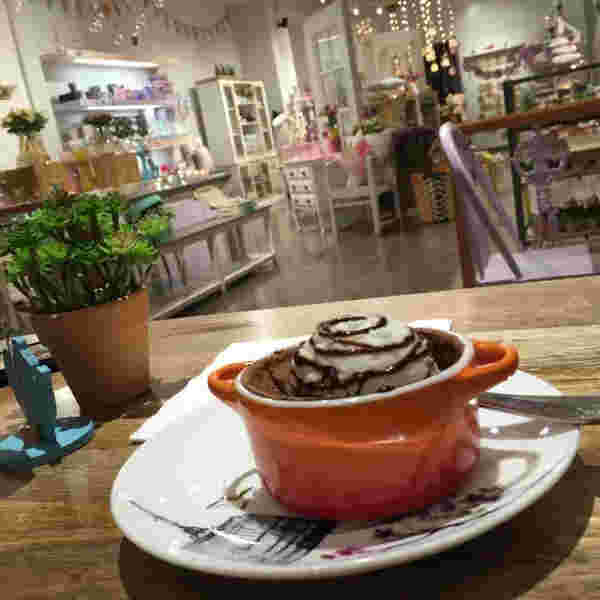
URL - https://ik.imagekit.io/demo/img/plant.jpeg?tr=w-300,h-200,cm-pad_resize,bg-F3F3F3,fo-left
We added the fo-left transformation to our image. Now, all the padding is on the right of the image, while the image itself is on the left (determined by the value of focus(fo) parameter).
Forced crop strategy - (c-force)
In a forced crop strategy, the output image's dimension (height and width) is exactly the same as requested, no cropping takes place, but the aspect ratio is not preserved. It forcefully squeezes the original image to get it to fit completely within the output dimensions.
Max-size cropping strategy - (c-at_max)
In the max-size crop strategy, whole image content is preserved (no cropping), the aspect ratio is preserved, but one of the dimensions (height or width) is adjusted.
The output image is less than or equal to the dimensions specified in the URL,i.e., at least one dimension will exactly match the output dimension requested, and the other dimension will be equal to or smaller than the corresponding output dimension requested.
If the requested dimension is more than the original dimension of the image, then the original image is returned without cropping. For enlarging image more than original dimensions check max-size-enlarge cropping strategy.
Max-size-enlarge cropping strategy - (c-at_max_enlarge)
This strategy is similar to the max-size cropping strategy with the addition that it also allows image to enlarge more than its original dimensions.
The output image is less than or equal to the dimensions specified in the URL,i.e., at least one dimension will exactly match the output dimension requested, and the other dimension will be equal to or smaller than the corresponding output dimension requested.
Min-size cropping strategy - (c-at_least)
This strategy is similar to the max-size cropping strategy, with the only difference being that unlike the max-size strategy, the image is equal to or larger than the requested dimensions. One of the dimensions will be exactly the same as what is requested, while the other dimension will be equal to or larger than what is requested.
Maintain ratio crop strategy - (c-maintain_ratio)
This is the default crop strategy. If nothing is specified in the URL, this strategy gets applied automatically. In this strategy, the output image's dimension (height and width) is the same as requested, and the aspect ratio is preserved. This is accomplished resizing the image to the requested dimension and in the process cropping parts from the original image.
By default ImageKit.io extract the image from the center but you can change this using focus parameter.
Extract crop strategy - (cm-extract)
In this strategy, the output image's dimension (height and width) is exactly the same as requested, and the aspect ratio is preserved. In this strategy, instead of trying to resize the image as we did in maintain ratio strategy, we extract out a region of the requested dimension from the original image.
By default, ImageKit.io extracts the image from the center but you can change this using the focus parameter.
Examples - Center and relative focus
Examples - Focus using cropped image coordinates
In the coordinate method of focus, we use the parameters x and y to determine the position of the top-left corner from where the extract would begin.
You can also provide arithmetic expression such as iw_mul_0.4 or ih_mul_0.4 as values for these parameters. This will first calculate the value of the expression and then use those values for extraction. Learn more about arithmetic expressions here.
Example URL - https://ik.imagekit.io/demo/img/plant.jpeg?tr=w-300,h-300,cm-extract,x-100,y-300 The extract is made starting from (100,300) point on the original image
Example - Focus using custom coordinates
Instead of specifying the x, y, xc or xy coordinates to focus on a particular area, you can also specify the focus area in an image while uploading the image or from the media library and then use fo-custom transformation in the image URL. ImageKit will then utilize the custom crop area specified with the image for all crop operations. This custom focus mode works for both the extract crop and the default maintain ratio crop strategy.
Unexpected behavior with auto rotation
ImageKit can be configured to auto-rotate images based on the Orientation value in the image metadata. This could result in unexpected behavior when using, cm-extract. In that case, you will have to adjust the values of x and y to accommodate for the oriented image.
Pad extract crop strategy - (cm-pad_extract)
The pad extract crop strategy is an extension of the extract crop strategy. In the extract crop strategy, we were extracting out a smaller area from a larger image. Now, there can be a scenario where the original image is small and we want to extract out a larger area (which is practically not possible without padding). So the pad extract mode adds a solid colored padding around the image to make it match the exact size requested.
This transformation is specified using the value cm-pad_extract transformation parameter in the URL.
Focus - (fo)
This parameter can be used along with pad resize, maintain ratio or extract crop to change the behaviour of padding or cropping. Learn more from the different examples shown in respective sections.
This parameter can have following values depending upon where it is being used:
left,right,top,bottomcan be to control the position of padding when used with pad resize. Learn from example.fo-customcan be used to define a specific focus area when used with maintain ratio and extract crop.center,top,left,bottom,right,top_left,top_right,bottom_leftandbottom_rightcan be used to define relative cropping during extract crop. Learn from examples.
Apart from above, fo parameter also have two additional options that intelligently detect the most important part of an image to create thumbnails i.e. auto and face. Let's see them in action:
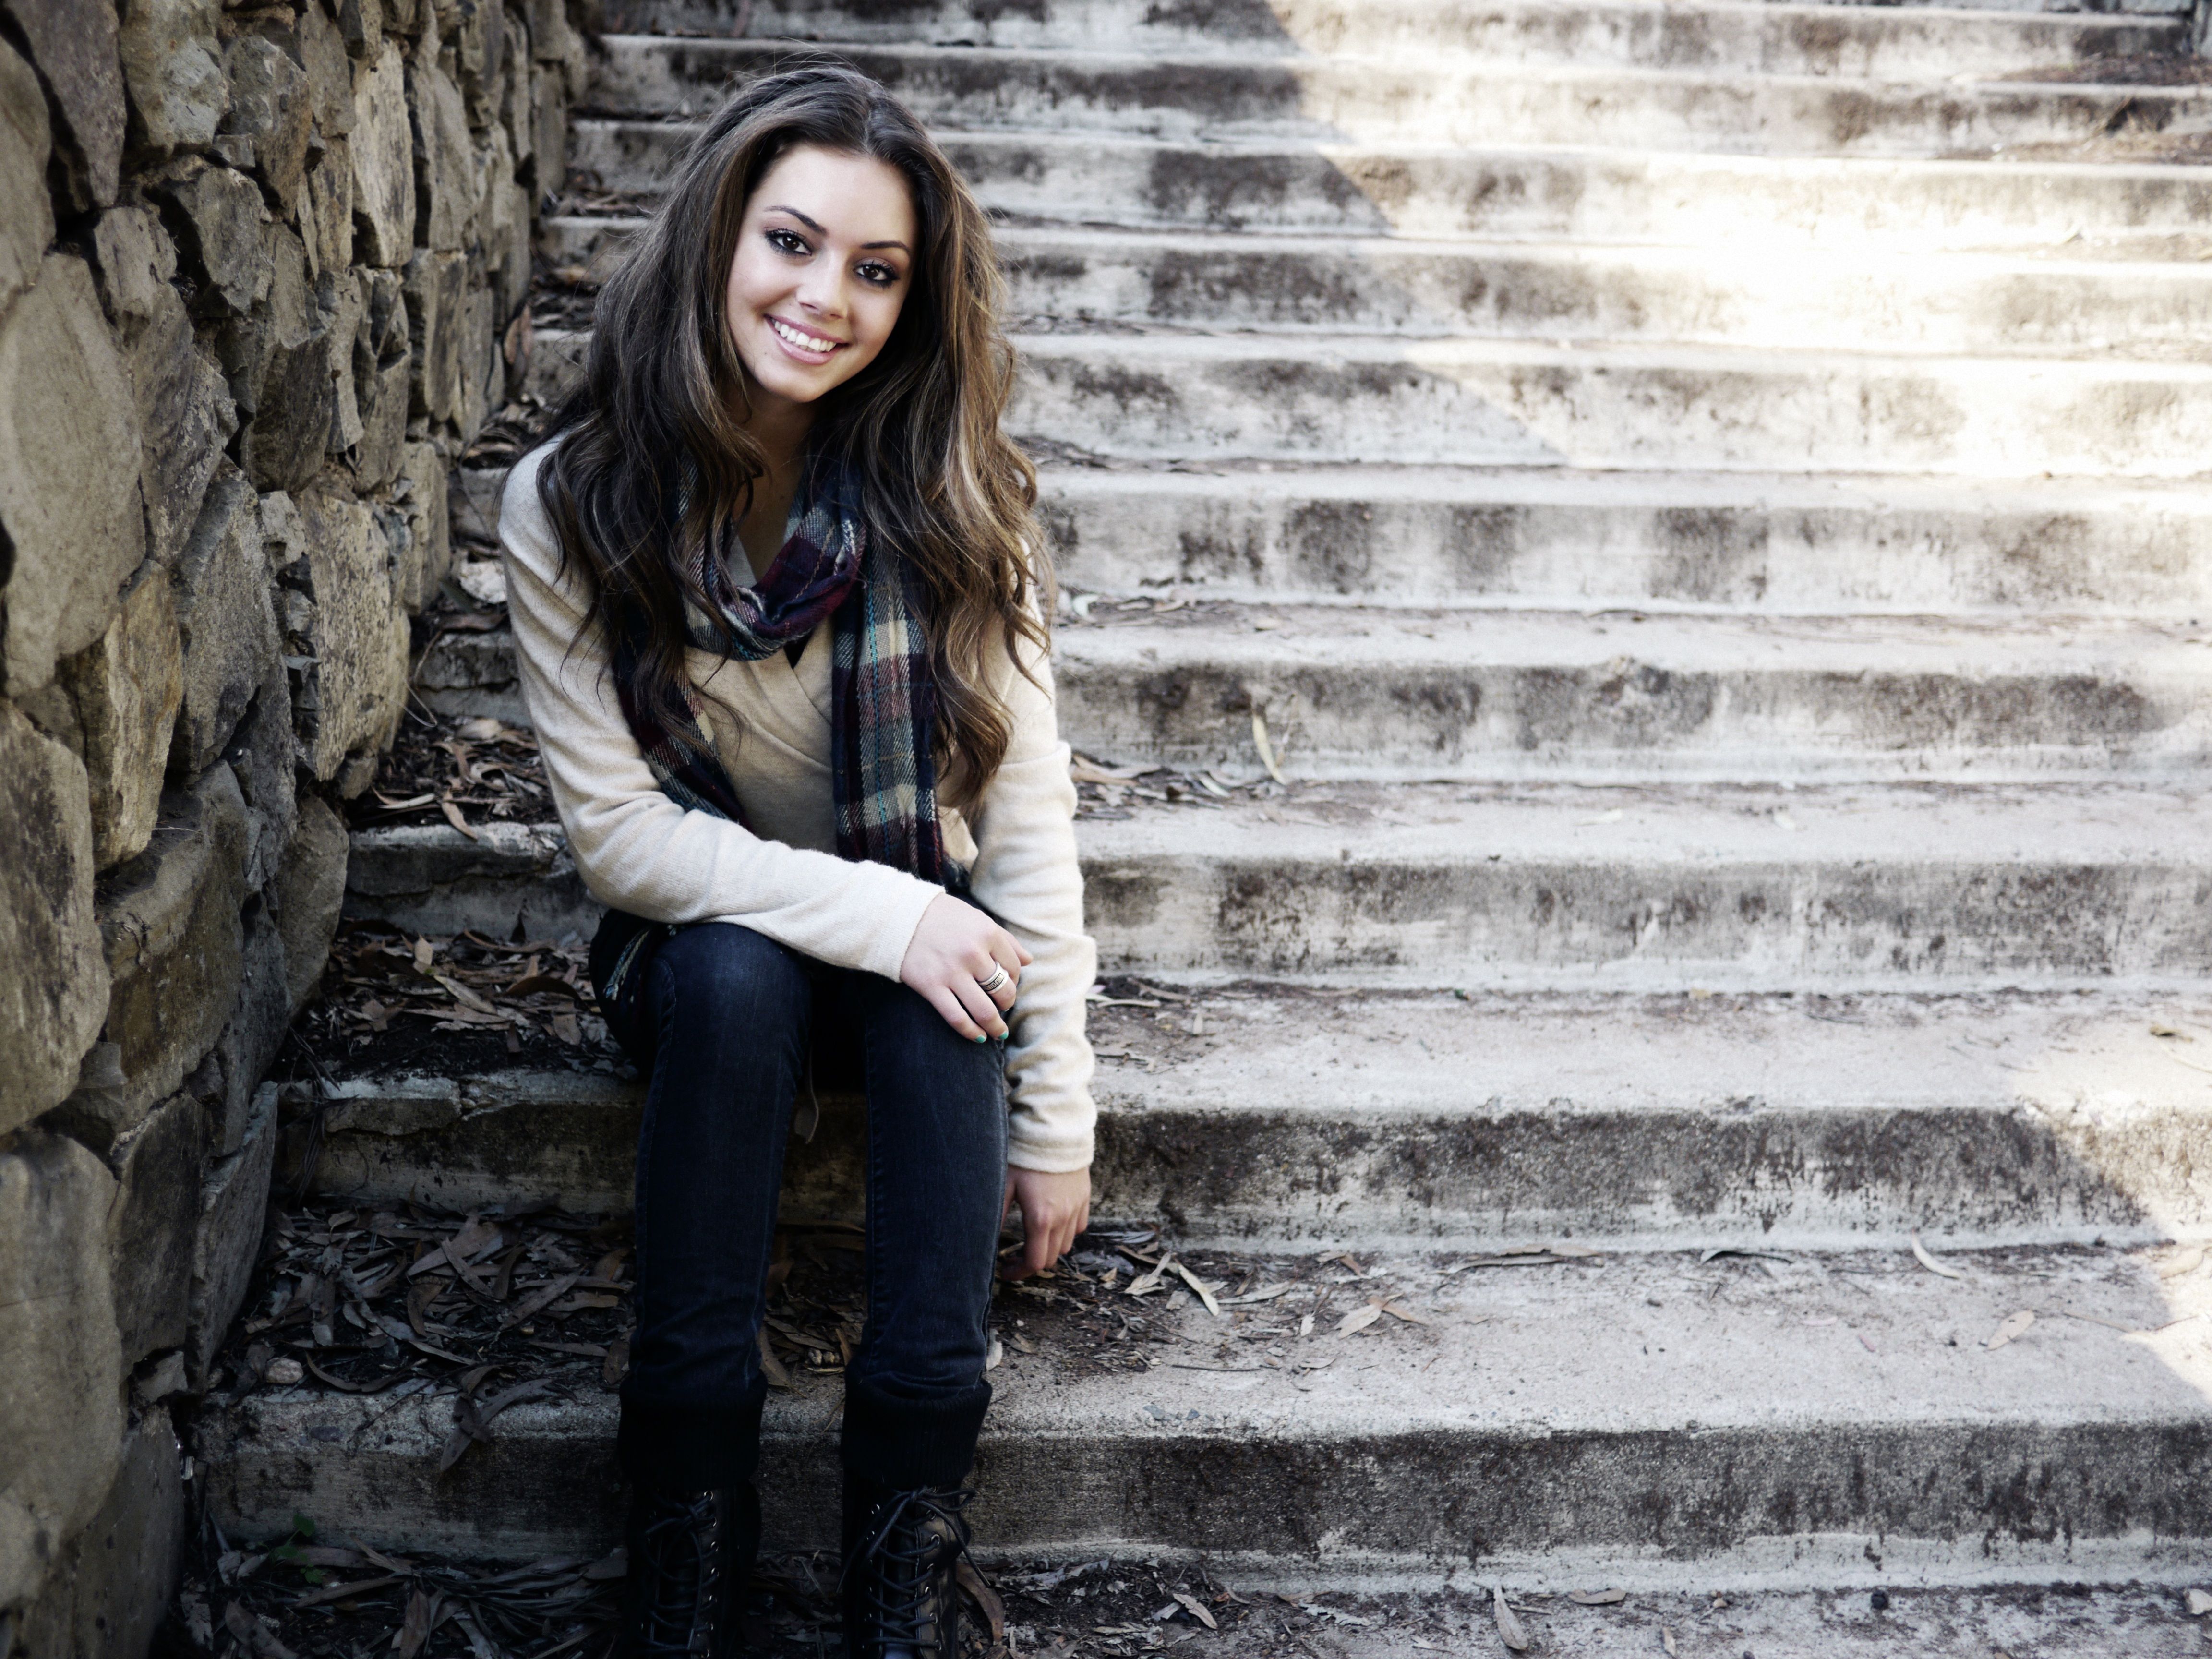
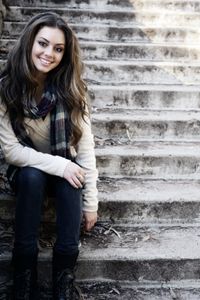
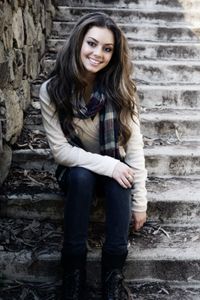
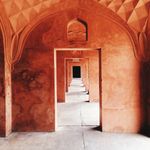
Auto smart cropping - (fo-auto)
In this mode, ImageKit automatically determines the most important part of the image and preserves it in the output thumbnail. This is enabled by passing the fo-auto parameter in the URL transformation parameters.
URL - https://ik.imagekit.io/demo/img/girl.jpeg For example, in the image below, the girl is the main subject of the image and she is slightly towards the left from the center of the image.
Face cropping - (fo-face)
In face crop, the crop works more like the extract crop strategy, but instead of focusing on the center of the image, it finds out the face (or multiple faces) in the image and focuses around that. This gives you perfect thumbnails with just the subject's face that make up for good profile pictures.
This mode is enabled using 'fo-face' parameter in the URL transformation parameters.
Note: Smart crop may not give accurate results for some images. This is partially a trade off between speed (needed for real-time transformations) and accuracy.
Zoom - (z)
This parameter accepts a number that determines how much to zoom in or out of the cropped area. It must be used along with fo-face. A value less than 1.0 zooms out to include more background surrounding the face, whereas a value larger than 1.0 zooms in to exclude more background surrounding the face.
Default Value - z = 1.0
Possible Values - 0 < z < 1 (zoom out); z > 1 (zoom in)
Commonly used transformations
Quality - (q)
Used to specify the quality of the output image for lossy formats like JPEG, WebP and AVIF. A large quality number indicates a larger output image size with high quality. A small quality number indicates a smaller output image size with lower quality.
Default Value - 80 (can be managed from image settings in dashboard)
Format - (f)
Used to specify the format of the output image. If no output image format is specified then based on your image settings in the dashboard, ImageKit.io automatically picks the best format for that image request.
Possible values include auto ,jpg , jpeg , webp, avif and png
Default Value - auto (from dashboard settings)
A few WebP images may not render correctly in Safari v14+ on MacOS v11+ and IOS 14 because of a possible OS-level issue.
Blur - (bl)
Used to specify the gaussian blur that must be applied to an image. The value of bl specifies the radius of the Gaussian Blur that is to be applied. Higher the value, the larger the radius of Gaussian Blur. Possible values include integers between 1 and 100.
Grayscale - (e-grayscale)
Used to turn an image to a grayscale version.
DPR - (dpr)
Used to specify the device pixel ratio that is used to calculate the dimensions of the output image. Extremely helpful when creating image transformations for devices with a high device pixel ratio (DPR > 1), like the iPhone or high-end Android devices.
The dpr parameter can only be used when either the height or width of the desired output image is specified.
If the output image's height or width after considering the specified DPR is less than 1px or greater than 5000px, the value of DPR is not considered and the height or width used in the URL is used.
Possible Values- 0.1 to 5 .
Alternatively, you can specify the auto value for this parameter (dpr-auto). Doing so will instruct ImageKit to read the dpr value from the Sec-CH-DPR Client Hint request header. Learn more about client hints here.
Named transformation - (n)
Named Transformations are an alias for the entire transformation string.
For example, we can create a named transformation - thumbnail for a transformation string - tr:w-100,h-100,c-at_max,fo-auto and is used like:
https://ik.imagekit.io/demo/img/tr:n-media_library_thumbnail/default-image.jpg
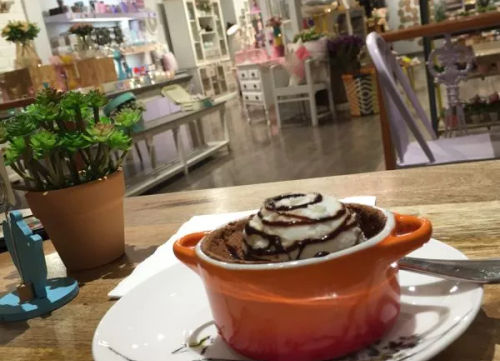
Default image - (di)
When an image that is requested using Imagekit.io does not exist, a 404 error is displayed. In certain scenarios, you would want a default image to be delivered instead of the 404 error message.
Imagekit.io provides an alternative to achieve this without having to make changes at the application level using this parameter. The image specified in this parameter should be accessible using the default endpoint of your ImageKit.io account. https://ik.imagekit.io/demo/tr:di-medium_cafe_B1iTdD0C.jpg/non_existent_image.jpg
If the default image is nested inside multiple folders, then you need to specify the entire default image path in this parameter. Replace
/with@@in the default image path. For example, if the default image is accessible onhttps://ik.imagekit.io/demo/path/to/image.jpg, then thediparameter should bedi-@@path@@to@@image.jpg.
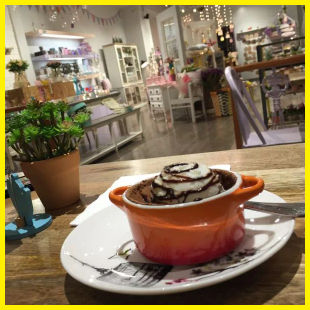
Progressive image - (pr)
Used to specify whether the output JPEG image must be rendered progressively. In progressive loading, the output image renders as a low quality pixelated full image which over time keeps on adding more pixels and information to the image. This helps you maintain a fast perceived load time.
Possible values - true and false.
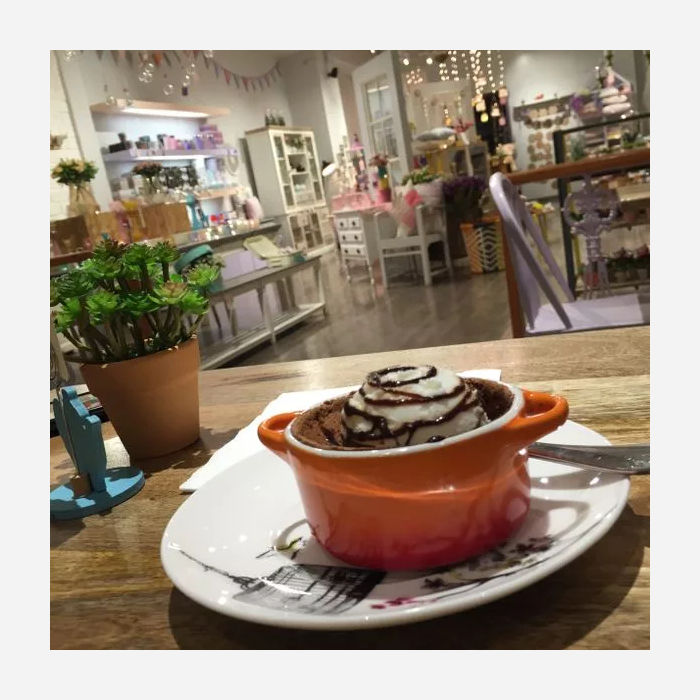
https://ik.imagekit.io/demo/tr:h-300,w-400,f-jpg,pr-true/medium_cafe_B1iTdD0C.jpg
Lossless WebP and PNG - (lo)
Used to specify whether the output image (if in JPEG or PNG) must be compressed losslessly. In lossless compression, the output file size is larger than the regular lossy compression. However, the perceived image quality can be higher in certain cases, especially for computer-generated graphics. Using lossless compression for photographs is not recommended.
Possible Values- true and false
https://ik.imagekit.io/demo/tr:w-500,h-361,lo-true/medium_cafe_B1iTdD0C.jpg
Trim edges - (t)
Useful with images that have a solid or nearly solid background with the object in the center. This parameter trims the background from the image, leaving only the central object in the output image.
Usage - t-true|Number
Possible Values include true and integer values between 1 and 99 that specify the threshold level for considering a particular pixel as "background".
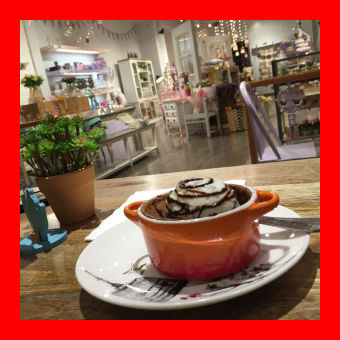
Border - (b)
This adds a border to the image. It accepts two parameters - the width of the border and the color of the border.
Usage - b-<border-width>-<hex code>
The width is specified as a number which is equivalent to the border width in pixels. The color code is specified as a 6-character hex code RRGGBB.
You can also provide an arithmetic expression such as ih_div_20_red, or cw_mul_0.05_FF00FF as a value for this parameter. Doing so will first calculate the value of the width and then apply transformations using that value. Learn more about arithmetic expressions here.
Color profile - (cp)
It is used to specify whether the output image should contain the color profile that is initially available with the original image. It is recommended to remove the color profile before serving the images on web and apps. However, if you feel that the output image looks faded or washed out after using ImageKit.io, and want to preserve the colors of your original image, you should set this parameter to true.
Default Value- false (from the dashboard)
Possible Values- true and false
Image metadata - (md)
It is used to specify whether the output image should contain all the metadata that is initially available with the original image. Image metadata is not relevant for rendering on the web and apps. It is, thus, recommended to not use it while delivering images. The only situation to enable the metadata option is when you want additional data like camera information, lens information, and other image profiles attached to your original image.
Default Value- false (from the dashboard)
Possible Values- true and false
Rotate - (rt)
It is used to specify the degree by which the output image must be rotated or specifies the use of EXIF Orientation Tag for the rotation of image using the auto parameter.
Possible Values- Any number for a clockwise rotation, or any number preceded with N for counter-clockwise rotation , and auto
Use auto if you want ImageKit.io to automatically rotate image based on EXIF orientation tag in image metadata.
Radius - (r)
It is used to specify the radius that must be used to obtain a rounded output image. To obtain a perfectly rounded image, set the value to max . This parameter is applied after resizing the original image, if defined.
Possible Values - Positive Integer and max
For simpler cases, you can use radius in the same transformation as the height and width parameters. However, if you are using advanced cropping parameters, like crop (c) and crop mode (cm), then you should chain the radius transformation in a step after the resizing transformation.
Background - (bg)
It is used to specify the background that can be used along with some cropping strategies while resizing an image. You can choose either a solid color or a blurred version of the same image as the background.
Default Value - black (00000)
Solid color
RGB Hex code: A 6-digit hex code (eg. AAFF00, 0f0fac)
RGBA Hex code: An 8-digit hex code. Last two characters must be a number between
00and99, specifying the opacity level (eg. AAFF0040, 0f0fac75)Color name: A standard color name in lowercase (eg. lightgreen, beige)
Blurred background
Syntax: blurred[_<BlurIntensity>][_<Brightness>]
| Parameter | Value | Description | Default |
|---|---|---|---|
Blur intensity |
| Set the intensity of blur | 'auto' |
Brightness | Integer from N255 to 255 | Negative value to make background darker and positive value to make the background lighter | 0 |
Limitation: Blurred background can only be used with cm-pad_resize
Blur intensity auto: The intensity of blur is automatically adjusted based on the provided height (h) & width (w) in the transformation.
Specifying a background for a PNG image
URL - https://ik.imagekit.io/demo/img/logo-white_SJwqB4Nfe.png?tr=bg-F00000
Original image - (orig)
By default, any image that is delivered via ImageKit.io always gets optimized in some way or the other. While this automatic optimization is great for web and apps, there might be certain cases where you want to get the original image as is. You can do so by using the parameter orig and set the value to true . If there are any other transformation parameters specified along with orig-true , then those get ignored.
Example - https://ik.imagekit.io/demo/tr:orig-true/medium_cafe_B1iTdD0C.jpg
Downloading file - (ik-attachment)
Set ik-attachment=true query param in the URL to download the file as an attachment rather than viewing it inline in the web browser.
By specifying this parameter in the file URL, ImageKit sets the content-disposition header in the response with the value attachment along with the file name.
Example - https://ik.imagekit.io/demo/medium_cafe_B1iTdD0C.jpg?ik-attachment=true
Last updated


