This is a quick start guide to show how to integrate ImageKit in a Vue.js application using the ImageKit Vue.js SDK. The code samples covered here are hosted on Github.
This guide walks you through the following topics:
- Setting up ImageKit Vue.js SDK
- Rendering images
- Setting the ImageKit context for the SDK
- Applying common image manipulations
- Adding overlays
- Lazy loading images
- Blurred image placeholder
- Client-side file uploading
- Rendering videos
Setup ImageKit Vue.js SDK
Install Vue CLI
npm install -g @vue/cli
# OR
yarn global add @vue/cli
Create a project
Let's create a dummy project called vuejs using vue CLI.
vue create vuejs
It will prompt the vue version and a few other options, select default by pressing enter. It will create a dummy project like this:

Install imagekitio-vue
npm install imagekitio-vue
# OR
yarn add imagekitio-vue
Initialize SDK
urlEndpointis the required parameter. You can get the value of URL endpoint from your ImageKit dashboard - https://imagekit.io/dashboard/url-endpoints.publicKeyandauthenticatorparameters are optional and only needed if you want to use the SDK for client-side file upload.publicKeycan be obtained from the Developer section on your ImageKit dashboard.authenticatorexpects an asynchronous function that resolves with an object containing the necessary security parameters i.e signature, token, and expire.
Let's modify src/components/HelloWorld.vue to import and initialize ImageKit as a plugin. Replace your_url_endpoint etc, with actual values.
<template>
  <div>
    <h1>ImageKit Vuejs quick start</h1>
  </div>
</template>

<script>
import { IKImage, IKContext, IKVideo, IKUpload } from "imagekitio-vue";

export default {
  name: "HelloWorld",
  components: {
    IKImage,
    IKContext,
    IKVideo,
    IKUpload,
  },
  props: {
    msg: String,
  }
}
</script>
This SDK provides 4 components:
IKImagefor image resizing. The output is a<img>tag.IKVideofor video resizing. This renders a<video>tag.IKUploadfor file uploading. The output is a<input type="file">tag.IKContextfor definingurlEndpoint,publicKeyandauthenticatorto all children elements.
You can import components individually.
import { IKImage, IKContext, IKVideo, IKUpload } from "imagekitio-vue";

export default {
  components: {
    IKImage,
    IKContext,
    IKVideo,
    IKUpload,
  }
}
Rendering images in Vue.js
Loading image using a relative path
Let's render an image at path /default-image.jpg.
<template>
  <div>
    <h1>ImageKit Vuejs quick start</h1>
    <IKImage :urlEndpoint="urlEndpoint" :path="path" width="400" />
  </div>
</template>

<script>
import { IKImage } from "imagekitio-vue";

let path = "/default-image.jpg";

export default {
  name: "HelloWorld",
  components: {
    IKImage,
  },
  data() {
    return {
      urlEndpoint: "https://ik.imagekit.io/demo",
      path,
    };
  },
  props: {
    msg: String,
  }
};
</script>
<IKImage urlEndpoint="https://ik.imagekit.io/demo" path="/default-image.jpg" width="400" />
renders to:
<img src="https://ik.imagekit.io/demo/default-image.jpg?ik-sdk-version=vuejs-1.0.6"
     class="ik-image"
     width="400">
The final result looks like this:

Loading image from an absolute path
If you have an absolute image path coming from the backend API e.g. https://www.custom-domain.com/default-image.jpg then you can use src prop to load the image.
For example:
<IKImage urlEndpoint="https://ik.imagekit.io/demo" width="400" src="https://ik.imagekit.io/demo/default-image.jpg" />
The output looks like this:

Setting ImageKit context for the SDK
It is not necessary to specify the urlEndpoint in every instance of IKImage. This can be managed much more easily with the IKContext component.
IKContext is a wrapper that can be configured with your SDK initialization parameters. Pass your urlEndpoint to it as a prop, and you're good to go!
Let's go ahead and import it within the file:
import { IKImage, IKContext } from "imagekitio-vue";
Now add the IKContext component to the render function:
<IKContext urlEndpoint="your_url_endpoint"></IKContext>
Let's nest our IKImage components within it, so that those can access the urlEndpoint from the context wrapper.
<template>
  <div>
    <IKContext :urlEndpoint="urlEndpoint">
      <IKImage path="default-image.jpg" width="400" />
    </IKContext>
  </div>
</template>
/*
    Replace your_url_endpoint with actual values
*/
<script>

import { IKContext, IKImage } from "imagekitio-vue";

export default {
  name: "HelloWorld",
  components: {
    IKContext,
    IKImage,
  },
  data() {
    return {
      urlEndpoint: "your_url_endpoint",
    };
  },
  props: {
    msg: String,
  },
};
</script>
Common image manipulation in Vue.js
This section covers the basics:
The Vuejs SDK gives a name to each transformation parameter e.g. height for h and width for w parameter. It makes your code more readable. If the property does not match any of the available options, it is added as it is. See the full list of supported transformations in Vuejs SDK on Github.
Note that you can also use h and w parameter instead of height and width.
Resizing images in Vue.js
Let's resize the image to width 300 and height 300.
<IKImage
  urlEndpoint="https://ik.imagekit.io/demo"
  path="/default-image.jpg"
  :transformation="[{ width: 300, height: 300 }]" />
The output looks like:

Quality manipulation
You can use the quality parameter to change quality like this:
<IKImage
  urlEndpoint="https://ik.imagekit.io/demo"
  path="/default-image.jpg"
  :transformation="[{quality: 40}]" />
The output is:

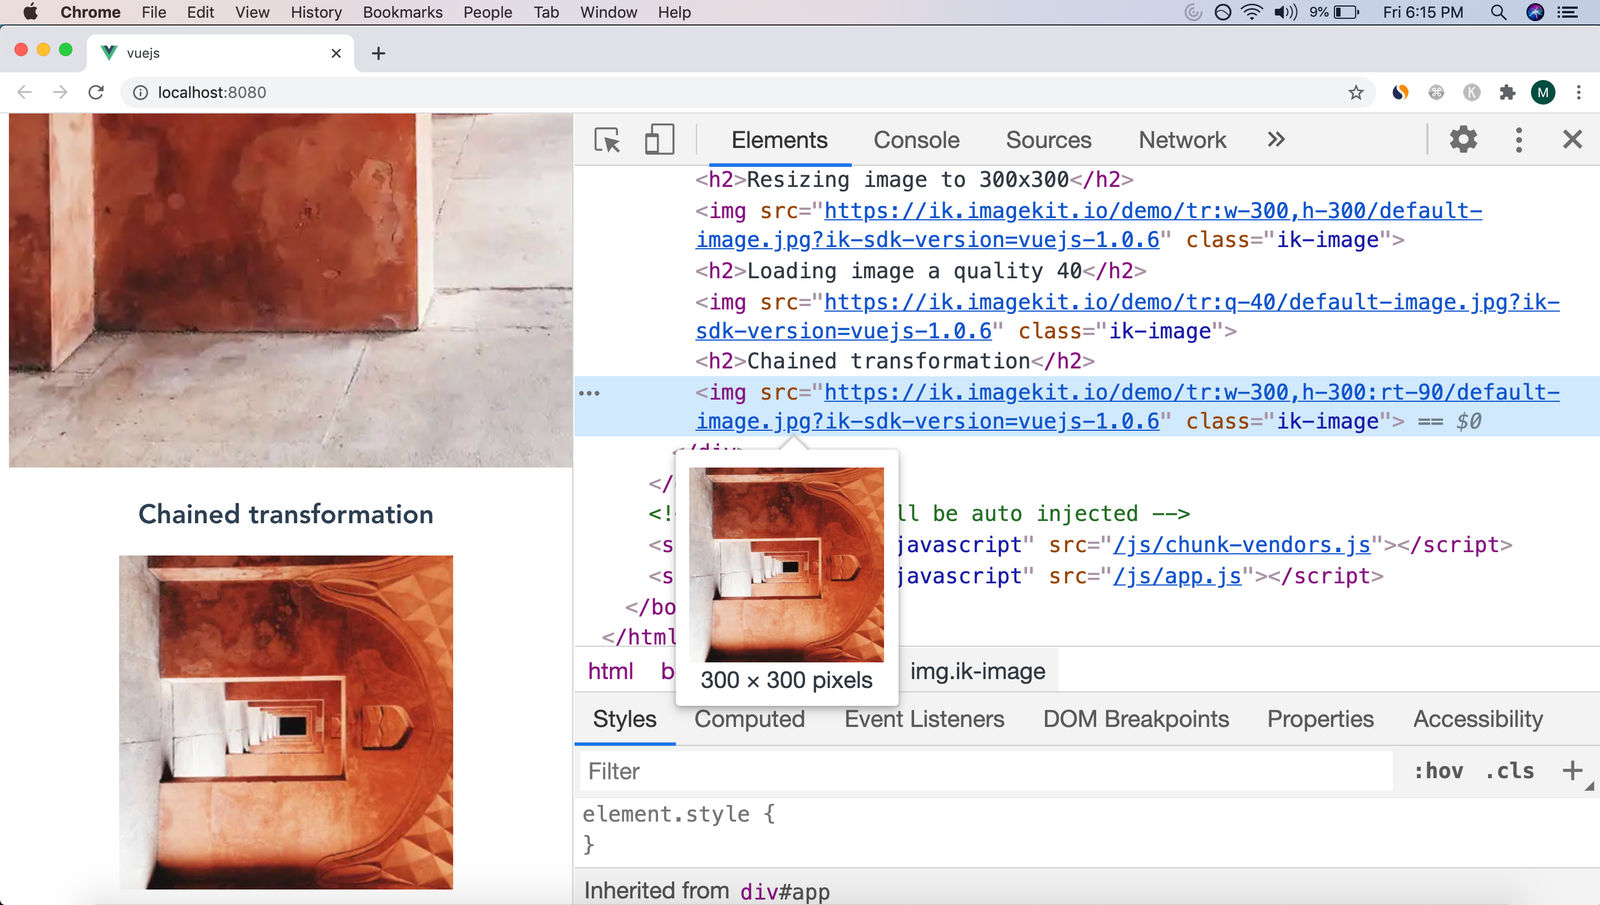
Chained transformation
You can pass more than one object in transformation prop to chain these transformations sequentially.
For example, the following values will first resize the image to width 300, height 300, and then rotate to 90 degrees.
// It means first resize the image to 400x400 and then rotate 90 degree
transformation = [
  {
    height: 300,
    width: 300
  },
  {
    rotation: 90
  }
]
So the following:
<IKImage
      urlEndpoint="https://ik.imagekit.io/demo"
      path="/default-image.jpg"
      :transformation="[{width: 300, height: 300}, {rotation: 90}]" />
renders to:
Adding overlays
ImageKit.io enables you to apply overlays to images and videos using the raw parameter with the concept of layers. The raw parameter facilitates incorporating transformations directly in the URL. A layer is a distinct type of transformation that allows you to define an asset to serve as an overlay, along with its positioning and additional transformations.
Text as overlays
You can add any text string over a base video or image using a text layer (l-text).
For example:
<IKImage
    path="/default-image.jpg"
    urlEndpoint="https://ik.imagekit.io/your_imagekit_id/endpoint/"
    :transformation="[{ "width": 400, "height": 300, "raw": "l-text,i-Imagekit,fs-50,l-end" }]"
/>
Sample Result URL
https://ik.imagekit.io/your_imagekit_id/tr:h-300,w-400,l-text,i-Imagekit,fs-50,l-end/default-image.jpg
Output Image:

Image as overlays
You can add an image over a base video or image using an image layer (l-image).
For example:
<IKImage
    path="/default-image.jpg"
    urlEndpoint="https://ik.imagekit.io/your_imagekit_id/endpoint/"
    :transformation="[{ "width": 400, "height": 300, "raw": "l-image,i-default-image.jpg,w-100,b-10_CDDC39,l-end" }]"
/>
Sample Result URL
https://ik.imagekit.io/your_imagekit_id/tr:h-300,w-400,l-image,i-default-image.jpg,w-100,b-10_CDDC39,l-end/default-image.jpg
Output Image:

Solid color blocks as overlays
You can add solid color blocks over a base video or image using an image layer (l-image).
For example:
<IKVideo
    path="/img/sample-video.mp4"
    urlEndpoint="https://ik.imagekit.io/your_imagekit_id/endpoint/"
    :transformation="[{ "width": 400, "height": 300, "raw": "l-image,i-ik_canvas,bg-FF0000,w-300,h-100,l-end" }]"
/>
Sample Result URL
https://ik.imagekit.io/your_imagekit_id/tr:h-300,w-400,l-image,i-ik_canvas,bg-FF0000,w-300,h-100,l-end/img/sample-video.mp4
Output Image:

Lazy-loading images in Vue.js
You can lazy load images using the loading prop in IKImage component. When you use loading="lazy", all images that are immediately viewable without scrolling load normally. Those that are far below the device viewport are only fetched when the user scrolls near them.
The SDK uses a fixed threshold based on the effective connection type to ensure that images are loaded early enough to finish loading once the user scrolls near them.
On fast connections (e.g. 4G), the value of the threshold is 1250px and on slower connections (e.g. 3G), it is 2500px.
You should always set the height and width of image element to avoid layout shift when lazy-loading images.
Example usage:
// Lazy loading images
<IKImage
  urlEndpoint="https://ik.imagekit.io/demo"
  path="/default-image.jpg"
  :transformation="[{height:300,width:400}]"
  loading="lazy"
  height="300"
  width="400"
/>
Blurred image placeholder
To improve user experience, you can use a low-quality blurred variant of the original image as a placeholder while the original image is being loaded in the background. Once the loading of the original image is finished, the placeholder is replaced with the original image.
// Loading a blurred low quality image placeholder while the original image is being loaded
<IKImage
  urlEndpoint="https://ik.imagekit.io/demo"
  path="/default-image.jpg"
  :lqip="{active:true}"
/>
By default, the SDK uses the quality:20 and blur:6. You can change this. For example:
<IKImage
  urlEndpoint="https://ik.imagekit.io/demo"
  path="/default-image.jpg"
  :lqip="{active:true, quality: 40, blur: 5}"
/>
Combining lazy loading with low-quality placeholders
You have the option to lazy-load the original image only when the user scrolls near them. Until then, only a low-quality placeholder is loaded. This saves a lot of network bandwidth if the user never scrolls further down.
// Loading a blurred low quality image placeholder and lazy-loading original when user scrolls near them
<IKImage
  urlEndpoint="https://ik.imagekit.io/demo"
  path="/default-image.jpg"
  :transformation="[{height:300,width:400}]"
  :lqip="{active:true}"
  loading="lazy"
  height="300"
  width="400"
/>
Uploading files in Vue.js
Vuejs SDK provides an IKUpload component, which can generate an input type="file" tag that you can use to upload files to the ImageKit media library directly from the client-side.
For using upload functionality, we need to pass publicKey and authenticator in IKContext. Replace your_url_endpoint , your_public_key, your_authentication_endpoint with actual values.
  <IKContext publicKey="your_public_key" urlEndpoint="your_url_endpoint" :authenticator="authenticator">
    <IKUpload
      :onError="onError"
      :onSuccess="onSuccess"
    />
  </IKContext>
Make sure that you have specified
authenticatorandpublicKeyin the parent IKContext component as a prop. The authenticator expects an asynchronous function that resolves with an object containing the necessary security parameters i.e signature, token, and expire. Endpoint forauthenticatorshould be implemented in your backend. Learn how to implement endpoint for authenticator on your server.
It is advised to setup a backend server for the creation of these security parameters. In the frontend an HTTP GET request can be made to fetch them using the authenticator function.
For this quickstart guide, we have provided a sample implementation of http://localhost:3001/auth in Node.js.
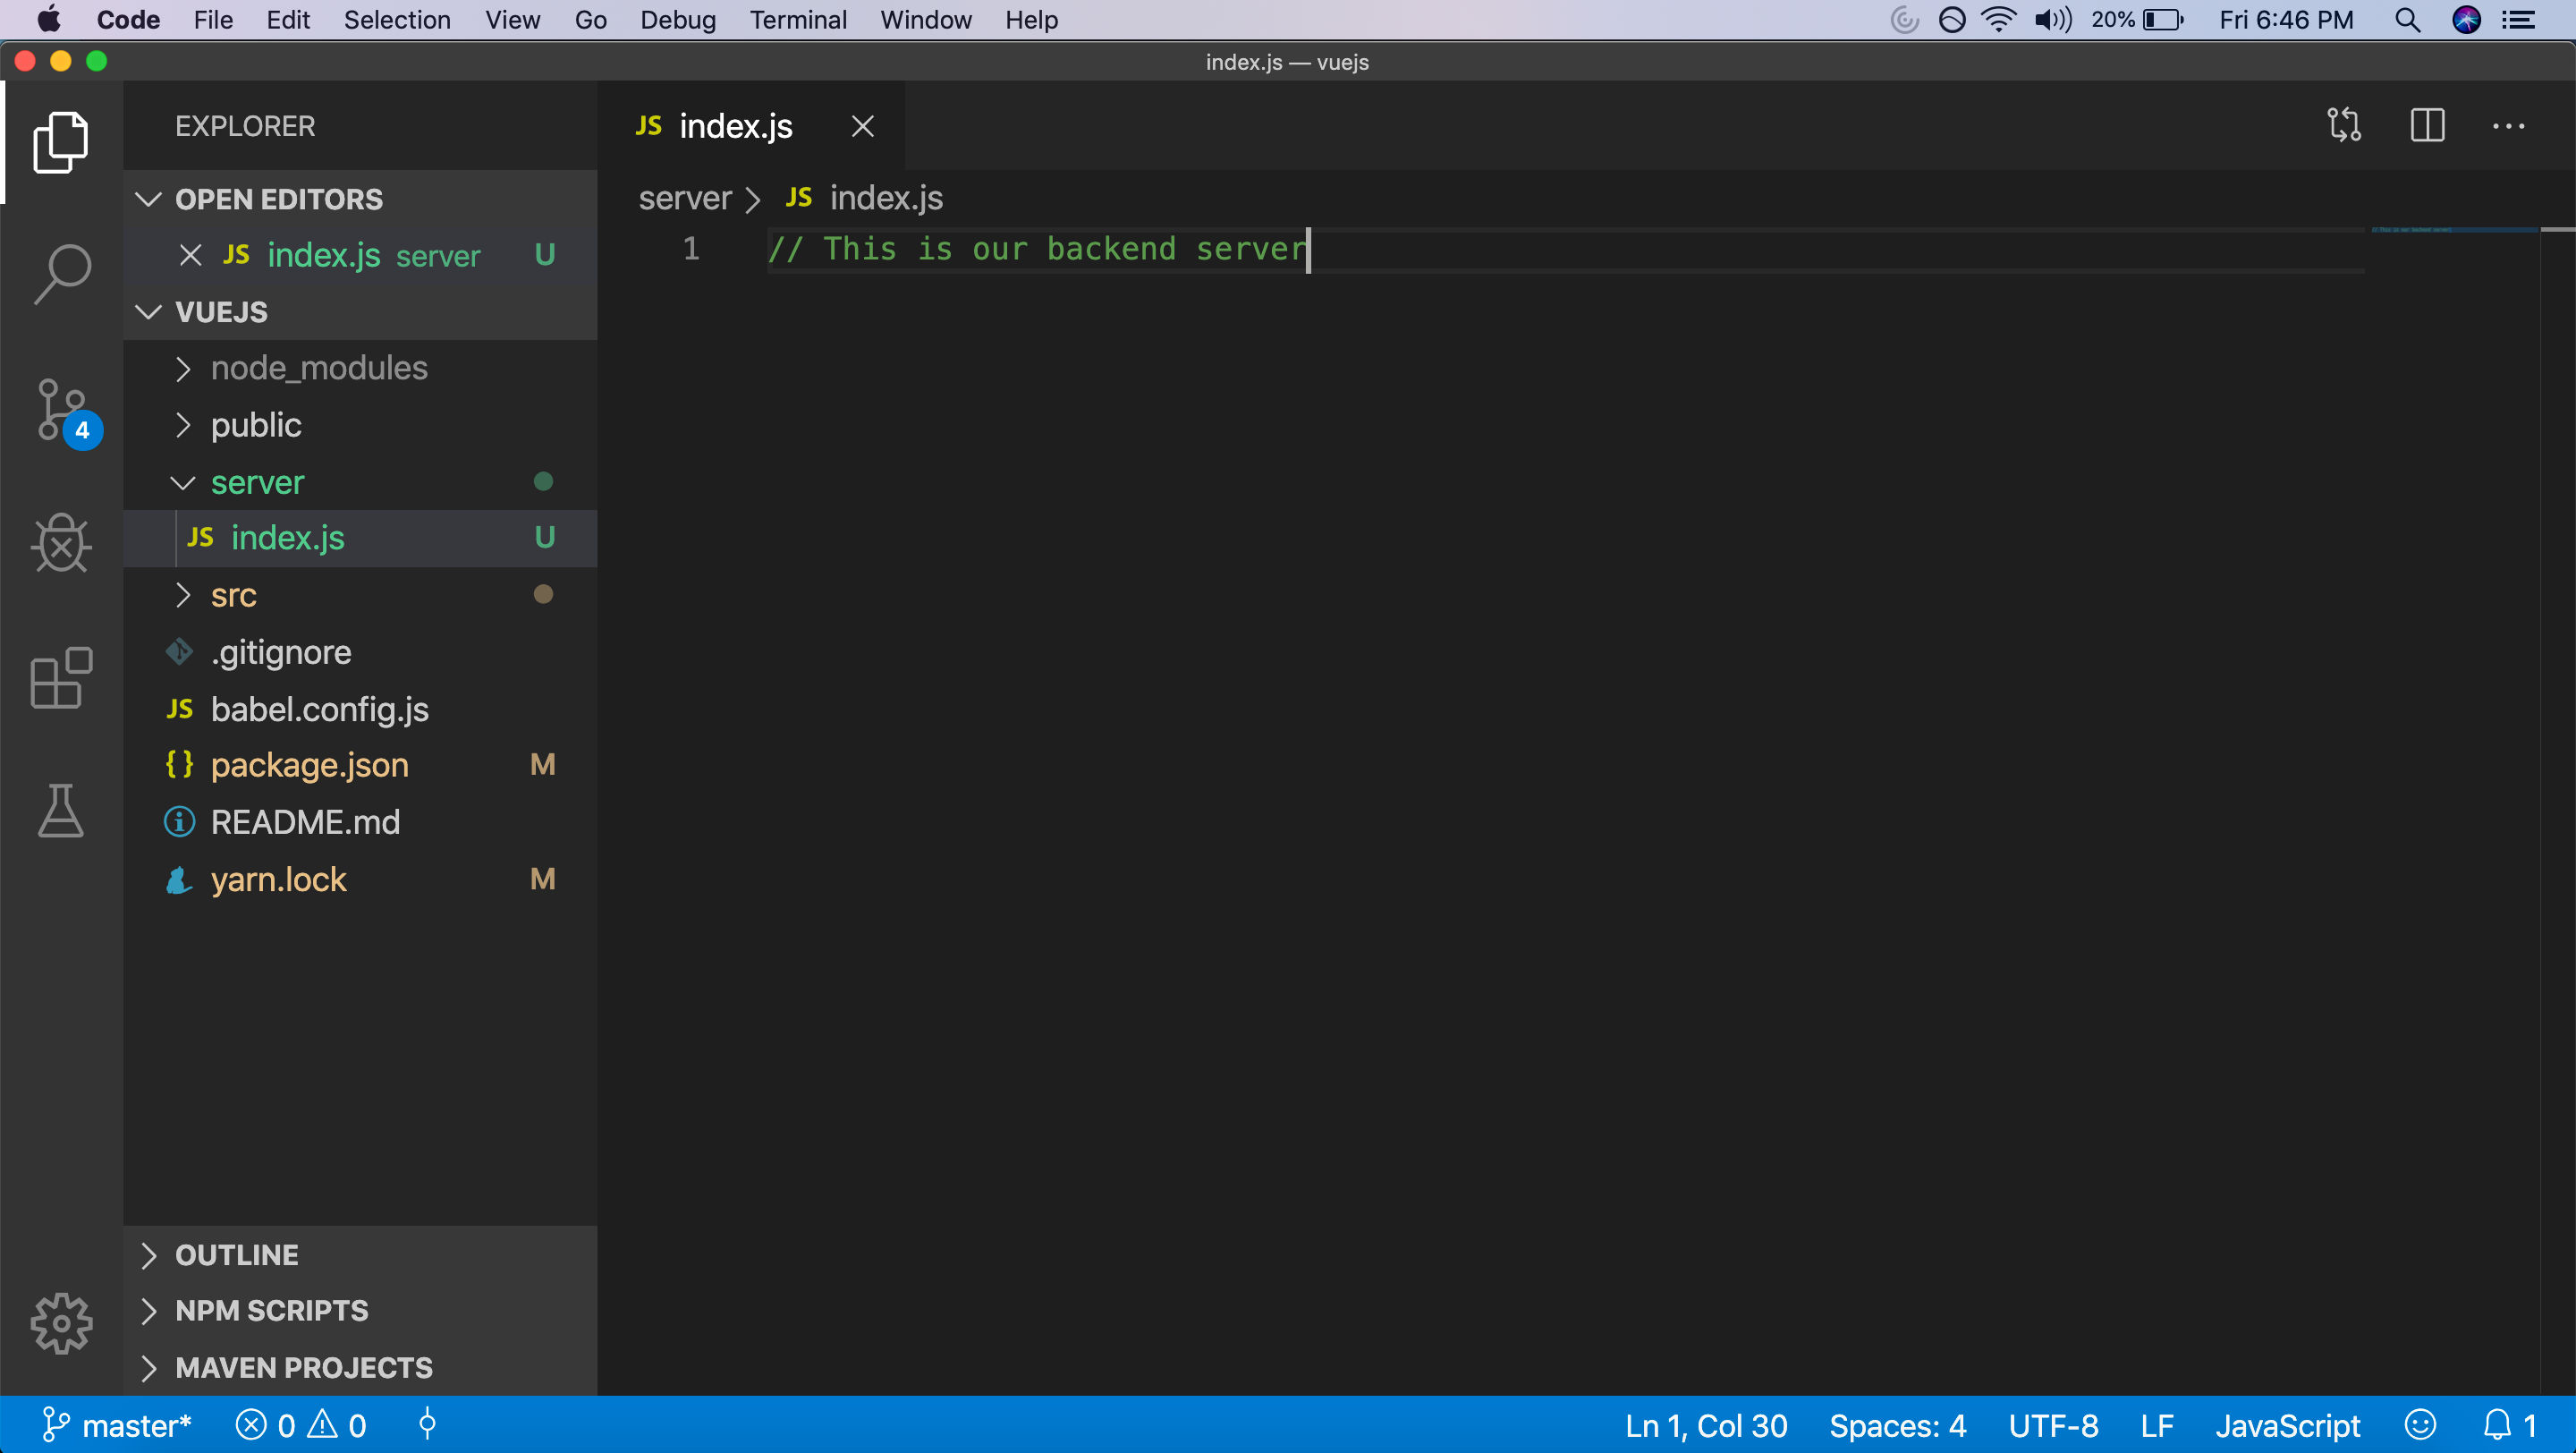
Let's create a file index.js inside server folder in the project root. It should look like this:
We will use the ImageKit Node.js SDK to implement http://localhost:3001/auth.
Let's first install all basic modules we need to run an HTTP server.
npm install express
npm install imagekit
Let's modify index.js to implement http://localhost:3001/auth which is our authenticationEndpoint.
/*
    This is our backend server.
    Replace your_url_endpoint, your_public_key, your_private_key
    with actual values
*/
const express = require('express');
const app = express();
const ImageKit = require("imagekit");

const imagekit = new ImageKit({
    urlEndpoint: "your_url_endpoint",
    publicKey: "your_public_key",
    privateKey: "your_privage_key"
})

app.get("/auth", function (req, res) {
    var result = imagekit.getAuthenticationParameters();
    res.send(result);
});

app.listen(3001, function () {
    console.log("Live at Port 3001");
});
<script>

import { IKContext, IKUpload } from "imagekitio-vue";

export default {
  name: "HelloWorld",
  components: {
    IKContext,
    IKUpload,
  },
  data() {
    return {
      urlEndpoint: "your_url_endpoint",
      publicKey: "your_public_key",
    };
  },
  props: {
    msg: String,
  },
  methods: {
    authenticator() {
      return new Promise((resolve, reject) => {
        var url = "http://localhost:3001/auth";

        // Make the Fetch API request
        fetch(url, { method: "GET", mode: "cors" }) // Enable CORS mode
          .then((response) => {
            if (!response.ok) {
              throw new Error(`HTTP error! Status: ${response.status}`);
            }
            return response.json();
          })
          .then((body) => {
            var obj = {
              signature: body.signature,
              expire: body.expire,
              token: body.token,
            };
            resolve(obj);
          })
          .catch((error) => {
            reject([error]);
          });
      });
    },
  },
};
</script>
Let's run the backend server.
cd server
node index.js
If you GET http://localhost:3001/auth, you should see a JSON response like this. Actual values will vary.
{
    token: "5dd0e211-8d67-452e-9acd-954c0bd53a1f",
    expire: 1601047259,
    signature: "dcb8e72e2b6e98186ec56c62c9e62886f40eaa96"
}
Let's include IKUpload component in the HelloWorld.vue.
<template>
  <div>
    <h1>ImageKit Vuejs quick start</h1>

    <h2>File upload</h2>
    <IKContext :publicKey="publicKey" :urlEndpoint="urlEndpoint" :authenticator="authenticator">
      <IKUpload
        :onError="onError"
        :onSuccess="onSuccess"
        :onUploadProgress="onUploadProgress"
        :onUploadStart="onUploadStart"
        :validateFile="validateFile"
        :transformation = "{
          pre: 'l-text,i-Imagekit,fs-50,l-end',
          post: [
              {
                  type: 'transformation',
                  value: 'w-100'
              }
          ]
        }"
      />
    </IKContext>
  </div>
</template>
/*
    Replace your_url_endpoint, your_public_key with actual values
*/
<script>

import { IKContext, IKUpload } from "imagekitio-vue";

export default {
  name: "HelloWorld",
  components: {
    IKContext,
    IKUpload,
  },
  data() {
    return {
      urlEndpoint: "your_url_endpoint",
      publicKey: "your_public_key",
    };
  },
  props: {
    msg: String,
  },
  methods: {
    onError(err) {
      try {
        console.log("Error");
        console.log(err);
      } catch (e) {
        console.error(e);
      }
    },
    onSuccess(res) {
      try {
        console.log("Success");
        console.log(res);
      } catch (e) {
        console.error(e);
      }
    },
    validateFile(res) {
      if (res.size > 0) {
        return true;
      }
      return false;
    },
    onUploadStart(event) {
      console.log("Upload started");
      console.log(event);
    },
    onUploadProgress(event) {
      console.log(`Upload inprogress ... (${((event.loaded * 100) / event.total).toFixed(2)}% Done)`);
      console.log(event);
    },
    authenticator() {
      return new Promise((resolve, reject) => {
        var url = "http://localhost:3001/auth";

        // Make the Fetch API request
        fetch(url, { method: "GET", mode: "cors" }) // Enable CORS mode
          .then((response) => {
            if (!response.ok) {
              throw new Error(`HTTP error! Status: ${response.status}`);
            }
            return response.json();
          })
          .then((body) => {
            var obj = {
              signature: body.signature,
              expire: body.expire,
              token: body.token,
            };
            resolve(obj);
          })
          .catch((error) => {
            reject([error]);
          });
      });
    },
  },
};
</script>
The output looks like:

When you choose a file, the file is uploaded. You can pass optional onSuccess, onUploadStart, onUploadProgress, validateFile and onError callback functions as props like we have.
After successful upload, you should see the upload API response in the console like this:

Abort upload
ref can be passed to obtain access to the IKUpload component's instance. Calling the triggerAbortUpload method will abort the upload if any is in progress.
Example Usage
<template>
  <IKUpload
    ref="childComponentRef"
    :publicKey="publicKey"
    :urlEndpoint="urlEndpoint"
    :authenticator="authenticator"
    :tags="['tag1','tag2']"
    :responseFields="['tags']"
    :onError="onError"
    :onSuccess="onSuccess"
    customCoordinates="10,10,100,100"
    :transformation = "{
      pre: 'l-text,i-Imagekit,fs-50,l-end',
      post: [
          {
              type: 'transformation',
              value: 'w-100'
          }
      ]
    }"
  />
  <button @click="abortChildUpload">Abort Child Upload</button>
</template>

<script>
import { IKUpload } from "imagekitio-vue"

export default {
  name: "app",
  components: {},
  data() {
    return {};
  },
  methods: {
    onError(err) {
      console.log("Error");
      console.log(err);
    },
    onSuccess(res) {
      console.log("Success");
      console.log(res);
    }
    abortChildUpload() {
      this.$refs.childComponentRef.triggerAbortUpload();
      console.log("Upload aborted")
    },
  }
};
</script>
Rendering videos
Rendering videos works similarly to rendering images in terms of usage of urlEndpoint param (either directly or via IKContext).
Loading video from relative path: Import IKVideo from the SDK:
import { IKVideo} from "imagekitio-vue";

export default {
  components: {
    IKVideo
  }
}
Now let's add it to our App. Along with the video path prop, it also needs the relevant urlEndpoint (either directly or via IKContext):
<IKContext urlEndpoint="https://ik.imagekit.io/demo">
  <IKVideo
    :path="videoPath"
    :transformation="[{ height: 200, width: 200 }]"
    :controls="true"
  />
</IKContext>
A more complex example:
<IKContext urlEndpoint="https://ik.imagekit.io/demo">
  <IKVideo
    className='ikvideo-with-tr'
    :path="videoPath"
    :transformation="[{ height: 200, width: 600, b: '5_red', q: 95 }]"
    :controls="true"
  />
</IKContext>